ユーザ操作に応じて全画面表示/通常表示を切り替える方法
前の記事に引き続き、Androidアプリで全画面表示する方法を書きます。今回は、ユーザの操作に従って、全画面表示と通常表示を切り替えてみました。
画面イメージ
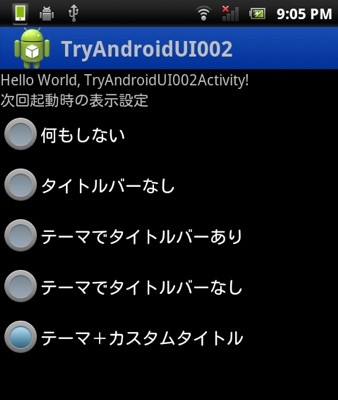
作成した画面のキャプチャを以下に貼付けました。画面では、ラジオボタンを用意して、ユーザが自由に、全画面表示(タイトルバーなし)や通常表示(タイトルバーあり)を切り替えられるようにしています。

「何もしない」を選ぶと、次回の画面表示時に、タイトルバーなし&ステータスバーありの表示を行います。「タイトルバーなし」を選ぶと、タイトルバーなし&ステータスバーなしを表示します。
「テーマでタイトルバーあり」を選ぶと、Androidのテーマ機能を利用してタイトルバーを表示します。「テーマでタイトルバーなし」ではテーマ機能でタイトルバーを非表示にします。「テーマ+カスタムタイトル」ではテーマ機能とJava側処理でアイコン付きのタイトルバーを表示します。
AndroidManifest.xml
AndroidManifest.xmlのactivityタグの定義を抜粋しました。ポイントは、android:theme属性で、タイトルバーなし(@android:style/Theme.NoTitleBar)を設定している事です。これがないと、アクティビティ表示時に一瞬タイトルバーが見えてしまいました。
        <activity
            android:name=".TryAndroidUI002Activity"
            android:label="@string/app_name"
            android:theme="@android:style/Theme.NoTitleBar" >
            <intent-filter>
                <action android:name="android.intent.action.MAIN" />
                <category android:name="android.intent.category.LAUNCHER" />
            </intent-filter>
        </activity>
アクティビティクラス
ユーザのラジオボタン指定に従って、タイトルバーやステータスバーの表示/非表示を切り替えたり、カスタムタイトルバーの設定をしたりしています。各処理は、各々決まったタイミングで処理しなければならないので、煩雑な実装になっています。ユーザのラジオボタン操作は、プリファレンスに登録し、次回画面表示時に読み込んでいます。スリープ処理は、「一瞬タイトルバーが表示される」現象が起きない事を確認するための処理です。もし間違った実装であれば、スリープ時の間、タイトルバーが見えてしまうはずです。
public class TryAndroidUI002Activity extends Activity implements
		OnCheckedChangeListener {
	private static final String KEY_VIEW_TYPE = "view_type";

	private RadioGroup radioGroup;

	@Override
	public void onCreate(Bundle savedInstanceState) {
		// 設定を取得する
		SharedPreferences sp = getPreferences(MODE_PRIVATE);
		int viewType = sp.getInt(KEY_VIEW_TYPE, 0);

		// テーマを設定する
		// 親クラスのonCreate()呼び出し前に設定すること
		switch (viewType) {
		case R.id.themeTitleRadioButton:
			// テーマを使ってタイトルバーあり
			setTheme(R.style.CustomTheme_Theme001);
			break;
		case R.id.themeNoTitleRadioButton:
			// テーマを使ってタイトルバーなし
			setTheme(R.style.CustomTheme_Theme001_NoTitle);
			break;
		case R.id.customTitleRadioButton:
			// タイトルバーありテーマ&カスタムタイトルバー
			setTheme(R.style.CustomTheme_Theme001);
			break;
		}

		// テーマ設定後に親クラスのonCreate()を呼ぶ
		// テーマ設定前に呼ぶと一部テーマが設定されなかったりする
		sleep(1000);
		super.onCreate(savedInstanceState);

		// タイトルバーの形式を指示する
		// setContentView()呼び出し前に実施すること
		switch (viewType) {
		case R.id.noTitleRadioButton:
			// タイトルバーなし
			getWindow().addFlags(WindowManager.LayoutParams.FLAG_FULLSCREEN);
			requestWindowFeature(Window.FEATURE_NO_TITLE);
			break;
		case R.id.customTitleRadioButton:
			// カスタムタイトルバー
			requestWindowFeature(Window.FEATURE_CUSTOM_TITLE);
			break;
		}

		// レイアウト設定
		setContentView(R.layout.main);

		// カスタムタイトルバーのレイアウトを設定する
		switch (viewType) {
		case R.id.customTitleRadioButton:
			getWindow().setFeatureInt(Window.FEATURE_CUSTOM_TITLE,
					R.layout.custom_title);
			break;
		}

		// ラジオボタン設定
		radioGroup = (RadioGroup) findViewById(R.id.radioGroup);
		radioGroup.check(viewType);
		radioGroup.setOnCheckedChangeListener(this);

		// コンテンツ設定
		TextView textView = (TextView) findViewById(R.id.textView1);
		textView.setText(getResources().getString(R.string.hello));
	}

	@Override
	public void onCheckedChanged(RadioGroup group, int checkedId) {
		SharedPreferences sp = getPreferences(MODE_PRIVATE);
		SharedPreferences.Editor editor = sp.edit();
		editor.putInt(KEY_VIEW_TYPE, checkedId);
		editor.commit();
	}

	private void sleep(long time) {
		try {
			Thread.sleep(time);
		} catch (InterruptedException e) {
			Log.d(getClass().getName(), getClass().getSimpleName()
					+ "#onCreate()," + e.getMessage());
		}
	}
}
レイアウトXML
画面のレイアウトでは、ユーザに操作してもらうラジオボタンを記述しています。
<?xml version="1.0" encoding="utf-8"?>
<LinearLayout xmlns:android="http://schemas.android.com/apk/res/android"
    android:layout_width="fill_parent"
    android:layout_height="fill_parent"
    android:orientation="vertical" >

    <TextView
        android:id="@+id/textView1"
        android:layout_width="fill_parent"
        android:layout_height="wrap_content"
        android:text="" />

    <TextView
        android:layout_width="fill_parent"
        android:layout_height="wrap_content"
        android:text="次回起動時の表示設定" />

    <RadioGroup
        android:id="@+id/radioGroup"
        android:layout_width="fill_parent"
        android:layout_height="wrap_content" >

        <RadioButton
            android:id="@+id/nothingRadioButton"
            android:layout_width="fill_parent"
            android:layout_height="wrap_content"
            android:text="何もしない" />

        <RadioButton
            android:id="@+id/noTitleRadioButton"
            android:layout_width="fill_parent"
            android:layout_height="wrap_content"
            android:text="タイトルバーなし" />

        <RadioButton
            android:id="@+id/themeTitleRadioButton"
            android:layout_width="fill_parent"
            android:layout_height="wrap_content"
            android:text="テーマでタイトルバーあり" />

        <RadioButton
            android:id="@+id/themeNoTitleRadioButton"
            android:layout_width="fill_parent"
            android:layout_height="wrap_content"
            android:text="テーマでタイトルバーなし" />

        <RadioButton
            android:id="@+id/customTitleRadioButton"
            android:layout_width="fill_parent"
            android:layout_height="wrap_content"
            android:text="テーマ+カスタムタイトル" />
    </RadioGroup>

</LinearLayout>
custom_title.xml
カスタムタイトルバーの内容を定義しています。何となくアイコンを追加してみました。
<?xml version="1.0" encoding="utf-8"?>
<LinearLayout xmlns:android="http://schemas.android.com/apk/res/android"
    android:layout_width="fill_parent"
    android:layout_height="fill_parent" >

    <ImageView
        android:layout_width="wrap_content"
        android:layout_height="wrap_content"
        android:layout_gravity="center_vertical|left"
        android:src="@drawable/ic_launcher" >
    </ImageView>

    <TextView
        style="?android:attr/windowTitleStyle"
        android:layout_width="wrap_content"
        android:layout_height="wrap_content"
        android:layout_gravity="center_vertical"
        android:layout_marginLeft="3dp"
        android:layout_weight="1"
        android:singleLine="true"
        android:text="@string/app_name" >
    </TextView>

</LinearLayout>
以上のようにして、タイトルバーやステータスバー、カスタムタイトルバーを、ユーザ操作によって、動的に切り替えるAndroidサンプルアプリを作る事ができました。